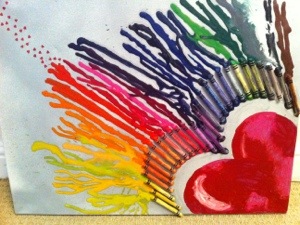
Yet another random Pinterest thing with my own take on it, crayon art.
I sprayed my canvas with some silver craft spray, which you all know I have ![]() coz I wanted a plain background but I didn’t really want white as the canvas was already white.
coz I wanted a plain background but I didn’t really want white as the canvas was already white.
I pencilled the heart onto the corner of the canvas and then stuck all the crayons as evenly spaced as I could with their bums on the pencil outline. I have chosen to do this in the corner but it also looks good in the centre of the picture.
I then got a second pack of crayons and unpeeled most of the wrappers off (I did learn from experience to not go past the colour name as you end up with numerous orange & blue crayons and you don’t have the foggiest which shade is which!), next the fun bit! Get your hair dryer on the highest heat setting you can but be careful that it is not too blowy as you end up with hot blowing wax! Start by melting the tips of the crayons on your picture and then letting them run down (you can prop your canvas up against a wall with newspaper underneath it).
I was pleased with the results but found there wasn’t quite enough wax for my liking and I didn’t want the crayon tips to completely disappear when I was melting them so this is where my second pack of crayons came in. There are a few ways to do this, you can just let them melt and run down your canvas again, being careful to do them in the same order as the ones you have stuck down or you can do what I did and lay the canvas flat, melt the end of the crayon with your hair dryer and use it to draw the lines with the melted wax. This way you can “fake” the path your melted wax takes in order to get the lines to go in the direction you want.
To add more colour you can fill in the gaps between the pre existing lines or just make your lines longer, I also finished by melting red crayons to colour the heart in.
Looks good, looks colourful and you can make simpler pictures that the kids can enjoy doing too. Each pack of crayons was 97p so bargain basement art to boot!


