Week 2 of the new term and I’m finding making lunchboxes booooooring! One child only has ham butties and the other has mainly salami & tuna (not both together I should hastily add)
So my project for the next few weeks is gonna be lunchboxes that can be made from freezer straight to bag and sandwiches are gonna be off the menu!
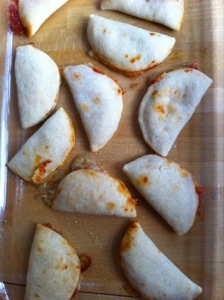
Number 1 – pepperoni pizza bites

I started with some shortcrust pastry which was
125g plain flour
55g butter
Pinch of salt
Water to mix
Rub the butter into the flour until you get what resembles fine breadcrumbs then add your salt and a little bit of water at a time until it binds together into a ball (around 30-45ml)
Roll the pastry out quite thin & cut out circles (if you don’t have a cutter use a pint glass or a small bowl). Spread some tomato paste on the circles, I usually add water to tomato purée to make this paste and I also add some honey & herbs (oregano is good) if you have some vegetable stock instead of just plain water this is good too my kids tend to find tomatoes a bit sharp so the sweetness just helps to cut through it.
Add some finely diced pepperoni and a small sprinkling of cheese and then fold the circles in half and seal. The best way to seal them is just to get your finger wet (keep a bowl of water next to you) and just run it round the outside of the circle to help it to stick together when you fold it. Then into the oven!, you will probably still get a bit of cheese leakage even if you seal it well so don’t worry just wipe it away when it’s hot or leave it to cool and cut it off.
The kids did sample them & gave them the ok so I’m gonna put some of the batch into the freezer, cling filmed into pairs ready to use in the next few weeks. If you put them into the lunchbox in the morning they will be defrosted in time for lunch ![]()


